The useState Hook
Understanding the useState Hook by building a random quotes generator
This article is the first in a series of articles about the various React Hooks with thorough explanations that I'll be creating. I'll talk about the useState Hook here. Perhaps the most popular Hook in React is this one. Buckle up if you're new to utilizing React because I'm about to take you on a ride into the useState Hook world.
What is Hook in React?
According to the official React documentation:
A Hook is a special function that lets you "hook into" React features.
NB: Hooks are only used in function components. Hooks can't be used in class components. In React, the convention for naming hooks is prefixing the Hook's name with "use". Example: useState; useEffect. Except in some instances like the "Custom Hook".
I'll be creating a simple random quote generator today that generates a new quote each time a button is clicked. Whenever the button is pressed, the background of this app will switch between two photos. I'll utilize useState Hook to accomplish this functionality.
useState Hook
The useState Hook lets you add a state in a function component. It lets you keep track of changes in your React app. The first step in using the useState Hook is importing it into your component.
Before getting into the specifics, let's first create the "quotes-generator" React application. Creating a React app will be nothing new to intermediate or skilled React readers. For the newcomers here, let's start with:
- Creating the React app with npm. It's also okay if you prefer using vite to create your React app. You can go ahead and use it.
- Navigating to the project folder
- Starting the React app
npx create-react-app quotes-generator

cd quotes-generator

npm start
The following files (App.css, App.test.js, setupTests.js, logo.svg, and reportWebVitals.js), which won't be utilized in the app, can be deleted after creating your React app.
The remaining folders and files would remain. The logic of the application will be written in the App.js file. The app will be styled in index.css (I'll be using the external styling method).
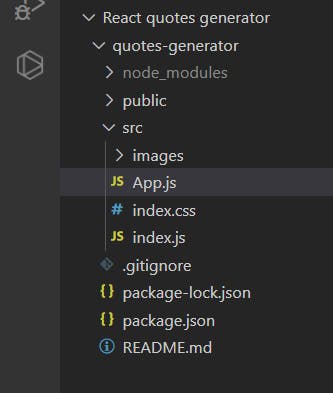
Inside the "src" folder, make an "images" folder and place 2 images inside it. Your project's file structure should now look like this:

Now go to the App.js file and begin developing the app's logic:
1. Import the Hook and images
The useState Hook must first be imported into the component. This is crucial because the app will not work without it. Next, is to import the images that will be used in the app.
import React, { useState } from 'react'
import pic from "./images/image1.jpg";
import pics from "./images/image2.jpg";
2. Declaring the state variable
The state variable would have to be declared and it accepts an initial state (in this case, "Don't ever give up" and false are the initial states) passed as an argument in the useState() and returns two values:
- The 1st value is the current state. In this case, "name" and "imgToggler".
- The 2nd value is the function that updates the state. In this case, "setName" and "setImgToggler".
const [name, setName] = useState("Don't ever give up");
const [imgToggler, setImgToggler] = useState(false);
3. Defining the function to handle the change
The function that will be defined (handleNameChange) will, later on, be added to the button that will toggle the texts and images. Inside this function, define a variable and set the various quotes that will be displayed.
Use a JavaScript Math method (Math.floor and Math.random) to enable us randomly get any of the defined set quotes.
const handleNameChange = () => {
    const names = [
      "Consistency is key",
      "Procrastination delays progress",
      "Don't ever compare yourself with anyone",
      "Give it your all",
      "Learn as if you will live forever, live like you will die tomorrow",
      "When you change your thoughts, remember to also change your world",
      "Success is not final; failure is not fatal: It is the courage to continue that counts",
      "Don’t let yesterday take up too much of today",
      "Goal setting is the secret to a compelling future",
      "Setting goals is the first step in turning the invisible into the visible",
      "He who conquers himself is the mightiest warrior",
      "Talent wins games, but teamwork and intelligence win championships",
    ];
    const int = Math.floor(Math.random() * 15);
}
4. Updating the state
Use the state updater function to modify the state. This will be done inside the handleNameFunction defined above.
setName(names[int]);

setImgToggler(!imgToggler)
5. Dynamic value in the JSX template
Although they appear to look like HTML codes, JSX templates are NOT. In order to update the changes for the image, we'll use a ternary operator. Keep in mind that in step 2, I set the image variable's initial state to "false." In essence, the ternary operator says "Display this image since the previous one is not being shown. If not, show this instead ". Every time the button is pressed, this update takes place.
<>
      <div className="App">
        <header>
          <h4>Daily Dose of Motivation</h4>
        </header>
        <main>
          <div className="container">
            {imgToggler ? <img src={pics} alt='house' /> : <img src={pic} alt='houses' />}
            <p>{name}!</p>
          </div>
          <button onClick={handleNameChange}>Generate Quote</button>
        </main>

      </div>
</>
The app is now complete and ready to function. This is how the App.js code file will look like now:
import React, { useState } from 'react'
import pic from "./images/image1.jpg";
import pics from "./images/image2.jpg";

function App() {
  const [name, setName] = useState("Don't ever give up");
  const [imgToggler, setImgToggler] = useState(false)
  const handleNameChange = () => {
    const names = [
      "Consistency is key",
      "Procastination delays progress",
      "Don't ever compare yourself with anyone",
      "Give it your all",
      "Learn as if you will live forever, live like you will die tomorrow",
      "When you change your thoughts, remember to also change your world",
      "Success is not final; failure is not fatal: It is the courage to continue that counts",
      "Don’t let yesterday take up too much of today",
      "Goal setting is the secret to a compelling future",
      "Setting goals is the first step in turning the invisible into the visible",
      "He who conquers himself is the mightiest warrior",
      "Talent wins games, but teamwork and intelligence win championships",
    ];
    const int = Math.floor(Math.random() * 15);
    setName(names[int]);

    setImgToggler(!imgToggler)
  }

  return (
    <>
      <div className="App">
        <header>
          <h4>Daily Dose of Motivation</h4>
        </header>
        <main>
          <div className="container">
            {imgToggler ? <img src={pics} alt='house' /> : <img src={pic} alt='houses' />}
            <p>{name}!</p>
          </div>
          <button onClick={handleNameChange}>Generate Quote</button>
        </main>

      </div>
    </>
  );
}

export default App;
Copy the CSS code below into your index.css file to style the application. Again, if you're comfortable styling it with whatever method you desire, go for it.
* {
  margin: 0;
  padding: 0;
  box-sizing: border-box;
}

html {
  font-size: 22px;
}

.App {
  display: flex;
  flex-direction: column;
  justify-content: center;
  align-items: center;
  width: 50%;
  max-width: 800px;
  margin: auto;
  margin-top: 1rem;
}

header {
  width: 100%;
  padding: 0.5rem 0.25rem;
  background-color: cornflowerblue;
  color: aliceblue;
  display: flex;
  justify-content: space-between;
  align-items: center;
  text-align: center;
  font-size: 20px;
}

main {
  width: 100%;
  display: flex;
  flex-direction: column;
  flex-grow: 1;
  justify-content: center;
  align-items: center;
  overflow-y: auto;
}

p {
  padding: 0 1.2rem;
  text-align: center;
  color: white;
  font-size: 30px;
  font-weight: bold;
  position: absolute;
  top: 50%;
  left: 50%;
  transform: translate(-50%, -50%);
}

img {
  width: 100%;
  height: 73vh;
  position: relative;
}

button {
  width: 30%;
  min-height: 48px;
  margin-top: 1.1rem;
  font-size: 1rem;
  border-radius: 0.25rem;
  box-shadow: 2px 2px 5px #000;
  padding: 0.25rem;
  margin-bottom: 1rem;
}

button:hover {
  background-color: cornflowerblue;
  color: white;
  outline: none;
  border: none;
  cursor: pointer;
}

@media only screen and (max-width: 415px) {
  .App {
    width: 90%;
    max-width: 500px;
  }
  p {
    padding: 0 0.2rem;
  }
  button {
    width: 50%;
    margin-bottom: 0.7rem;
  }
}
@media only screen and (width: 540px) {
  p {
    padding: 0 0.1rem;
  }
}
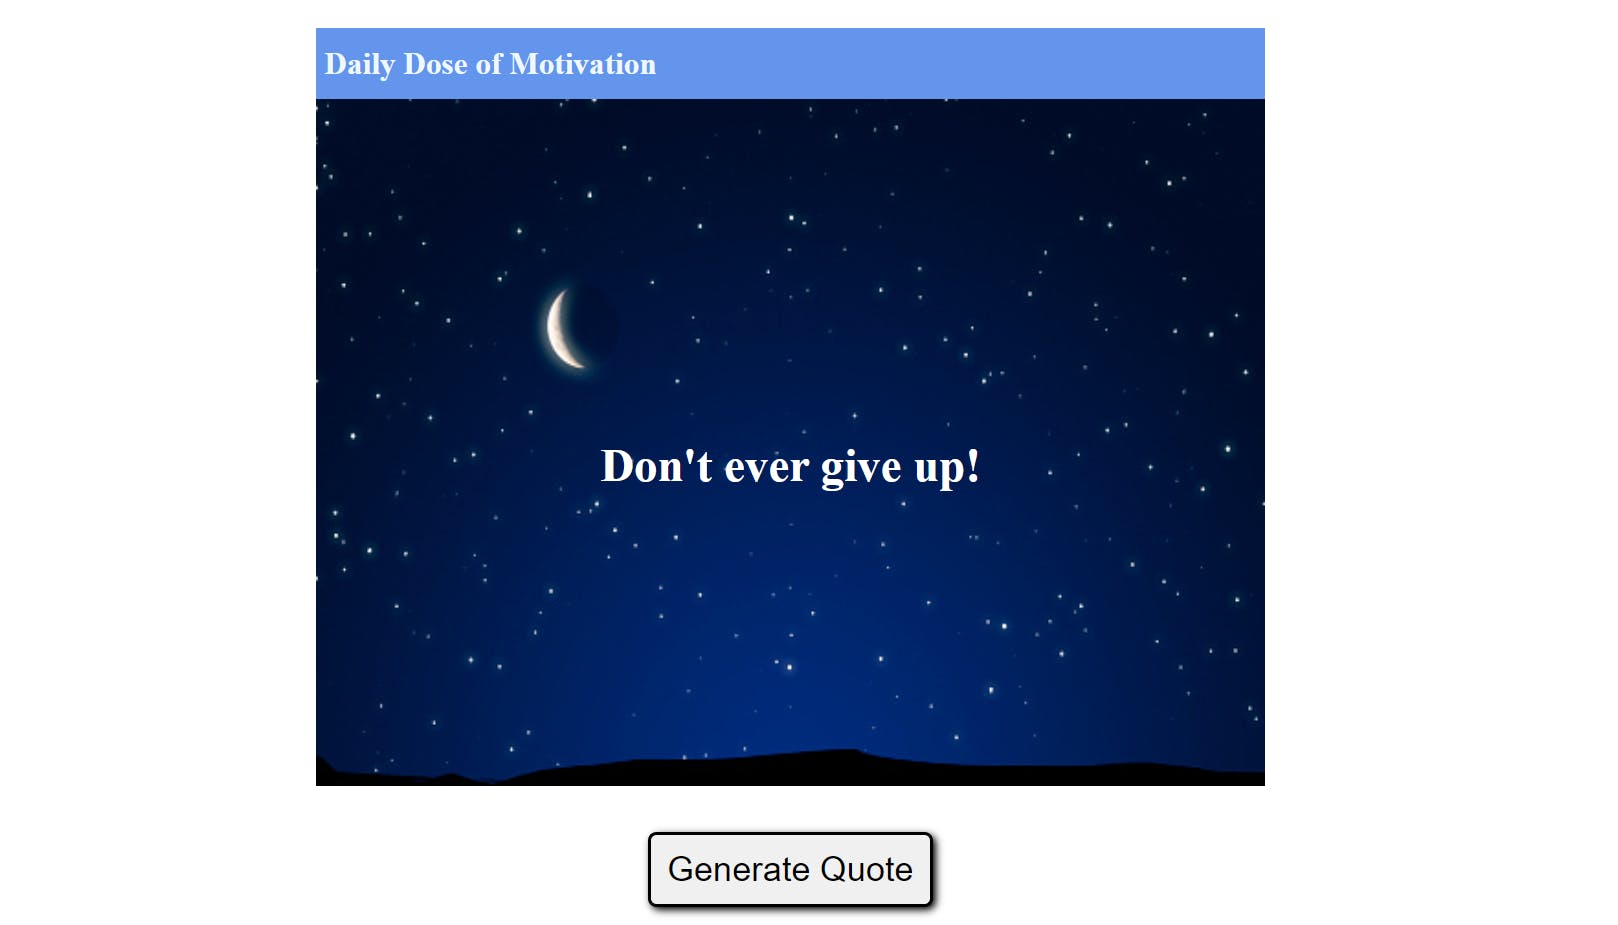
This is the live output of the codes in the browser.

Now if you click the "Generate Quote" button, a new text and a different image will be displayed. It will alter if you click the button once more, and so on.
Here's the deployed app if you want a quick demo of how it works.
I really hope you found this article helpful. Keep an eye out for my next article, it might be the second article in my React Hooks series.
